Let’s talk about Facebook ads.
It’s time you expand your customer base with Facebook marketing.
Why?
Because there’s great advertising potential there.
There are around 3 million businesses that actively promote their products and services through Facebook advertising.
If you haven’t hopped on this digital marketing train yet, our guide will help you learn how to create a Facebook marketing strategy.
We’re here to:
- Discuss the main types of Facebook ads
- Talk about Facebook ads specs
- Give you tips on creating great content for Facebook ads
Plus, we’re going to take you through a step-by-step process of successfully setting up ads on Facebook.
Shall we cut to the chase?
Key types of Facebook ads
Before we get to the technicalities of how to create lead generation ads, let’s have a look at what types of ads you can create using Facebook.
Plus, we prepared examples for you to see what the best Facebook ads look like for each Facebook ad format.
Below, we’ll tell you about:
- Single image ads or photo ads
- Facebook video ads
- Carousel ads or slideshow ads
- Product catalog ads aka collection ads
- Instant experience, full-screen ads
Let’s start with the simplest and most common one.
Type #1: Image ads
A single photo with headline and link. Good for simple offers, announcements, and product highlights.
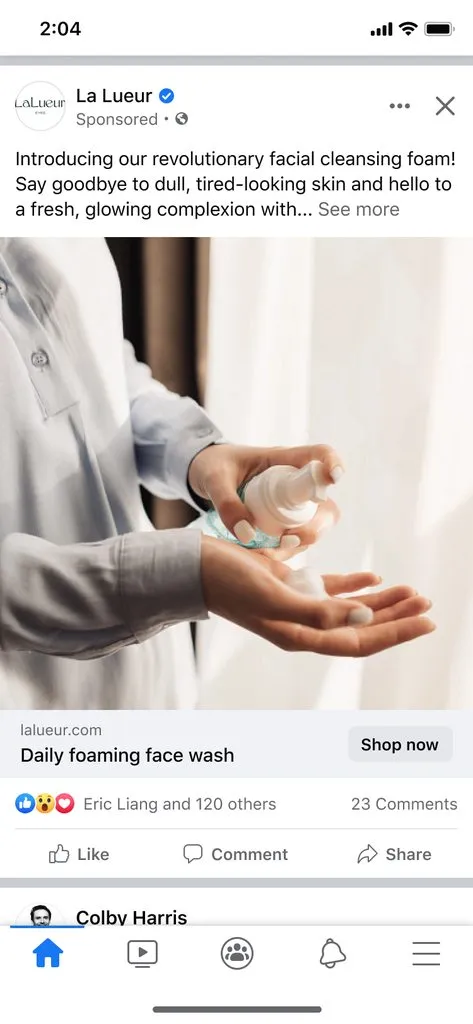
In the example above, the ad copy is short and to the point.
Moreover, it aligns with the CTA, “Shop Now”.
It couldn't be more straightforward than this, right?
{{drive-sales-with-ugc-ads="/post-cta-component/drive-sales-with-ugc-ads"}}
Type #2: Video ads
Short clips that drive attention and recall. Use to show product use, proof, or stories.

In this example, Microsoft uses a video ad to prompt its audience to visit their website and learn more about Microsoft AI innovation.Thus, the campaign objective here is brand awareness.
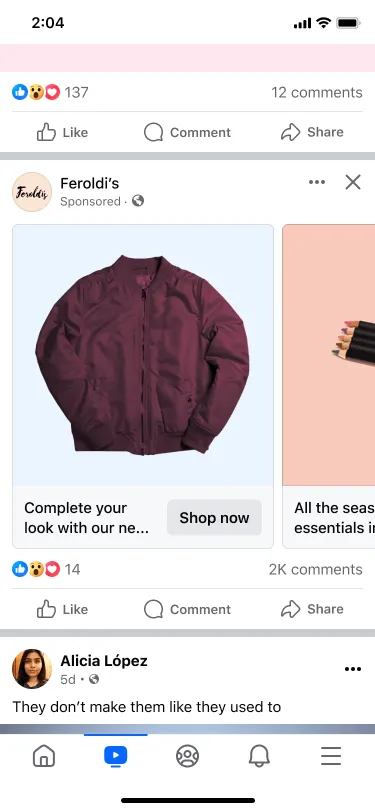
Type #3: Carousel ads
Up to 10 cards of images or videos. Show multiple SKUs or step‑by‑step features.
This makes it one of the most engaging forms of Facebook advertising.
Plus, it’s an amazing format for remarketing products.
Type #4: Instant Experience (full-screen)
Tap to open a full‑screen experience. Combine images, video, copy, and links in one flow.

The screenshots above were taken on a mobile device. The first one depicts the ad as it appears in the feed, while the second screenshot shows the full-screen video upon clicking the ad.
This format truly removes all distractions and lets the viewer concentrate on what you have to say.
Type #5: Collection
A cover media with a shoppable grid. Best for catalogs and themed bundles on mobile.
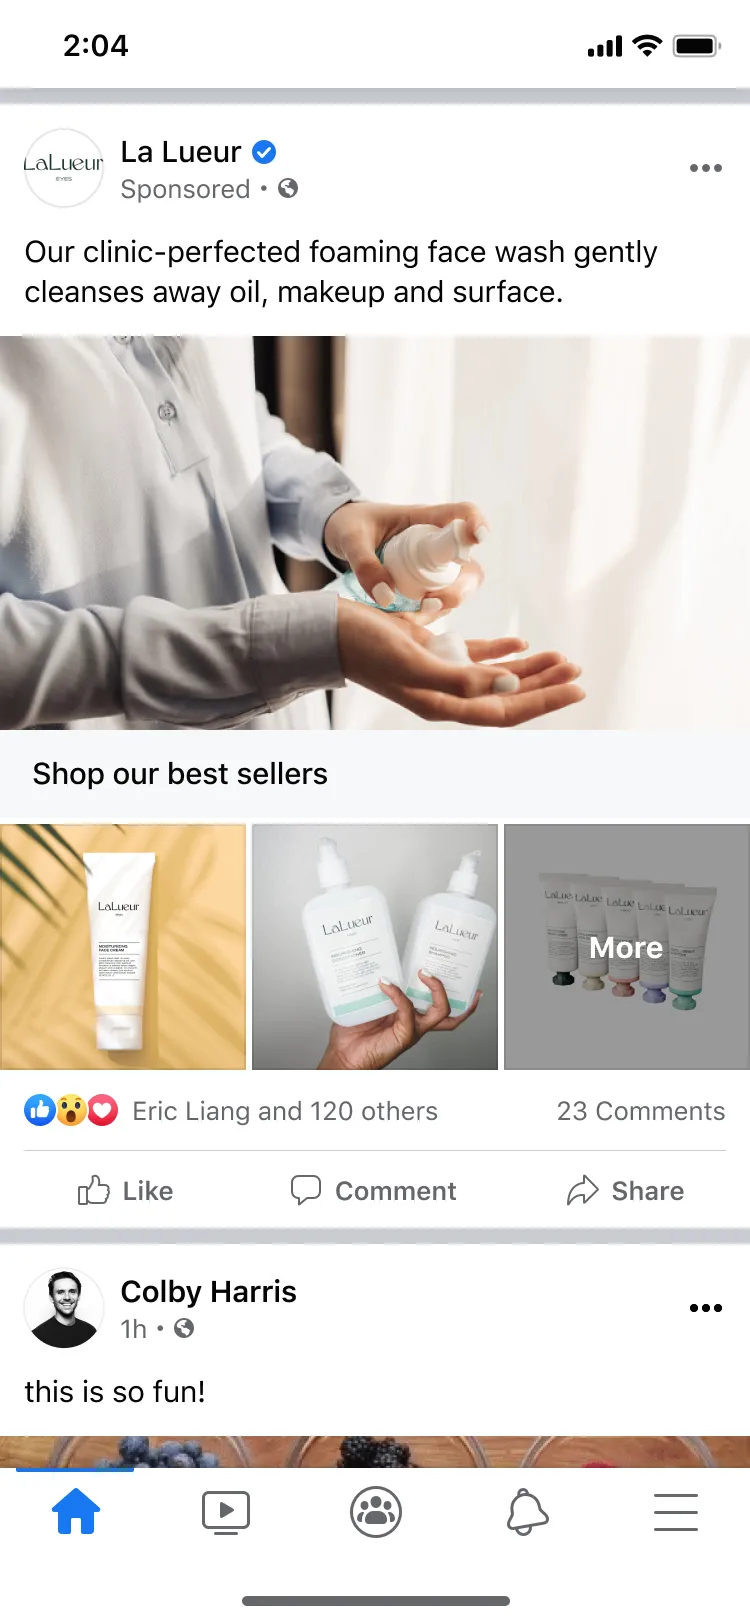
Clearly, this format is great for showcasing collections and new product catalogs.
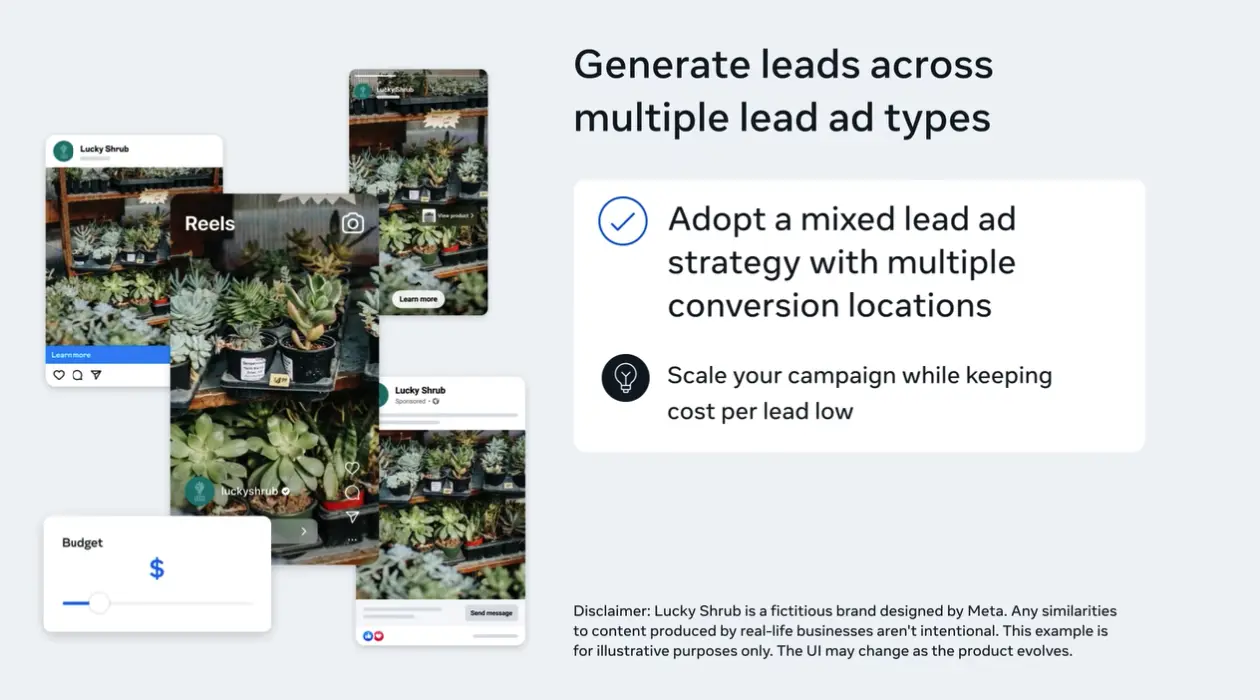
Type #6: Lead ads
Built‑in forms to capture emails or sign‑ups without leaving Facebook.
Type #7 Dynamic ads
Auto‑promote items from your catalog to people who viewed or added to cart.
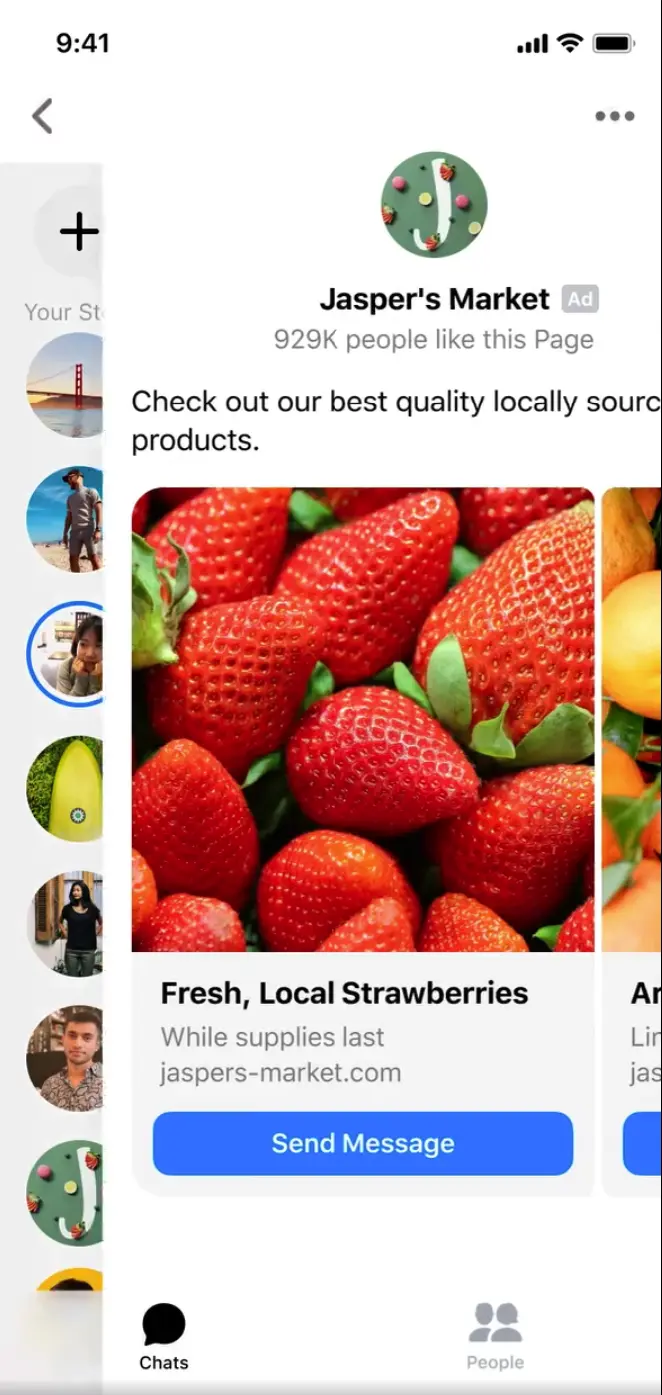
Type #8 Messenger ads
Open a conversation in Messenger from the ad. Useful for sales consults or support.
Type #9 Stories ads
Vertical, full‑screen placements between Stories. Fast, immersive and mobile‑first.
Type #10 Reels ads
Vertical short‑form video in the Reels feed. Great for quick demos and social proof.
Type #11 Poll ads
Add a two‑option poll to drive interaction and learn preferences.
Type #12 Augmented Reality (AR) ads
Interactive try‑ons and effects. Useful for beauty, accessories, and home décor.
Which Facebook ad type is most effective?
Effectiveness depends on the goal:
- Awareness and recall: Video, Reels, Stories.
- Traffic and consideration: Image, Video, Carousel.
- Leads: Lead ads.
- Sales and retargeting: Dynamic and Collection.
- Engagement and signals: Poll and Stories.
- Conversations: Messenger.
Pick the format that fits your objective. Then match creative to the placement.
The Most Important Facebook Ads Specs You Should Know
Each ad format has specific technical requirements and content recommendations.
So, before starting to work on your creatives, have a look at the specs below.
However, please note that we only highlighted the most important ad specs for each category.
For the complete list of recommendations, please follow the links added at the beginning of each section.
1. Image ads
Images used in image ads should be in JPG or PNG format, with a ratio of 1.91:1 to 1:1 and a minimum resolution of 1080 x 1080 pixels.
The image size must not exceed 30MB and shouldn't have less than 600 pixels in both width and height.
Alternatively, you can also use panoramas and 360 photos in your image ads.
- Display: 1440 × 1440 (1:1) or 1440 × 1800 (4:5).
- Min size: 600 px.
- File: PNG or JPG. Max 30 MB.
- Keep text minimal for clarity.
2. Video ads
The supported video formats for Facebook video ads are MP4, MOV, and GIF. The aspect ratio for video ads displayed on both desktop and mobile devices is 1:1, while for mobile-only ads is 4:5.
- Display: 1440 × 1440 (1:1) or 1440 × 1800 (4:5).
- File: MP4, MOV, GIF. Max 4 GB.
- Max length (tech): 241 min. Best practice: keep it short.
3. Carousel ads
Carousel Facebook ads should contain images that respect the aforementioned image and video ad specs.
Moreover, you can add between two and ten carousel cards per ad.
- Cards: 2–10.
- Images/Videos follow the image/video specs above.
- Aspect ratio: 1:1 or 4:5.
4. Collection ads
Collection ads should contain JPG or PNG images and/or MP4, MOV, or GIF videos with a ratio of 1:1, and a minimum resolution of 1080 x 1080 pixels.
Now that you’re up to speed with the specs, you can get to work.
5. Stories ads (Facebook Stories)
- Vertical: 1440 × 2560 (9:16).
- Image max 30 MB; video max 4 GB.
- Video shows in segments; short clips render best.
6. Reels video ads (Facebook Reels)
- Vertical: 1440 × 2560 (9:16).
- File: MP4, MOV, GIF. Max 4 GB.
- Keep captions and on‑screen text clear and safe‑zone aligned.
7. Search, Right‑column, Marketplace (quick notes)
- Search results: Use 1:1 creative aligned to query intent.
- Right‑column (desktop): 1:1 image. Keep visuals simple.
- Marketplace: 1:1 image. Treat like a product listing visual.
8-Step Guide to Successfully Set up Ads on Facebook
Although it might look super complicated, setting up your first Facebook ad is easier than you would ever think.
Read below and see for yourself how you can power different types of Facebook ads in eight easy steps.
Step #1: Start a new Facebook ad campaign using your Facebook Ads Manager
First, click on the "Create Ad" button on the left side of the Ad Manager screen.
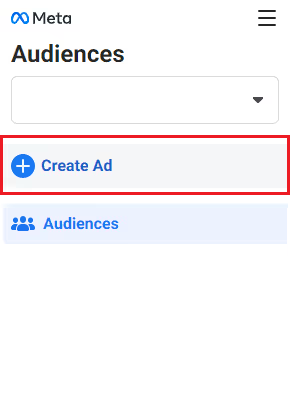
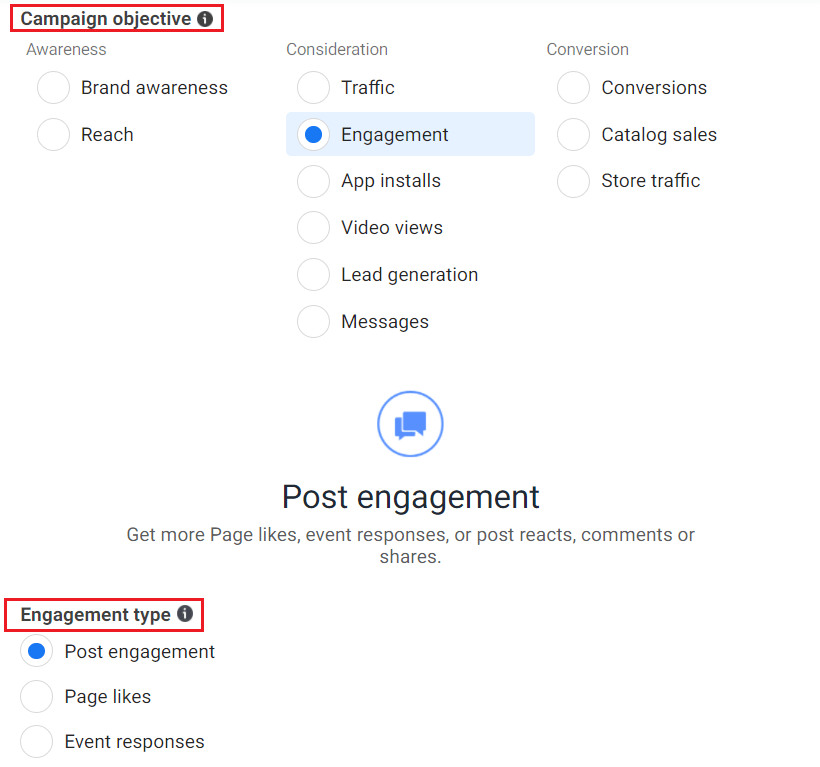
Then, you will be prompted to the "Create new campaign" menu, where you first need to choose a campaign objective.

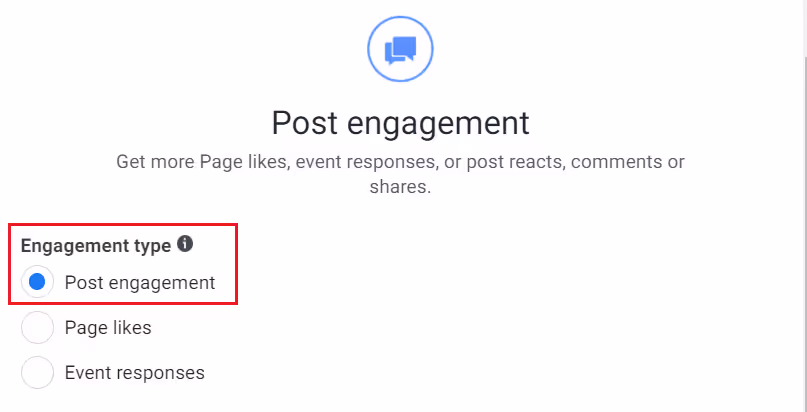
For this example, we'll go with engagement.
Moreover, for each available campaign objective, there are multiple sub-objectives you can choose from. For instance, there are three engagement types you can choose from:
- Post engagement
- Page likes
- Event responses
We’ll go with post engagement.
After selecting the desired objective, you can go on and name your campaign, then click "Continue".

Step #2: Set up your Facebook ad campaign details
Now, you can start setting up your ad campaign's details.
First, go to the “Buying type” section. Usually, the auction is selected by default and available for all advertisers.
However, there are two more buying types that are accessible to more experienced advertisers. Let’s have a look at each type below.
- Auction: Your ads will compete with other ads in an auction. The ad with the higher total value and most relevant to the audience will win the auction.
- Reach and Frequency: Buy ads in advance with a fixed price, manually handle ad delivery, and customize the frequency cap.
- TRP: Available only upon request and suitable for big and experienced advertisers.
Your “Buying type” screen should look like the image below.

Next, you can change your campaign's objective in case you’ve decided that your initial selection doesn’t reflect your business needs.
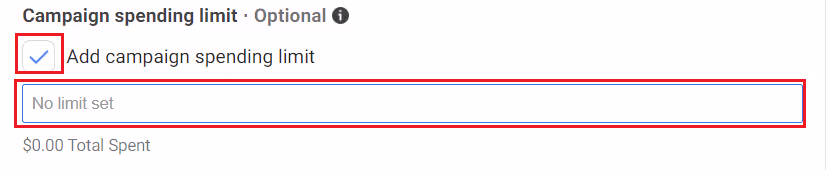
Then, you can add a "Campaign spending limit" of minimum $100 (optional).
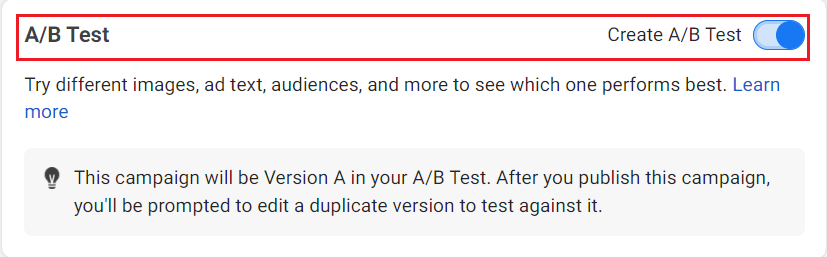
After that, you can enable the A/B testing feature that will allow you to try out different creatives to see which one works best for your audience.
Under the "A/B Test" box, you can enable the Campaign Budget Optimization feature to help you distribute your ad budget across your ad sets more efficiently while automatically accounting for each ad's performance.
When enabling the Campaign Budget Optimization, you will have to choose between the two available types of Campaign Budgets:
- Lifetime Budget: The general budget for the ad.
- Daily Budget: A budget limit to be spent per day.

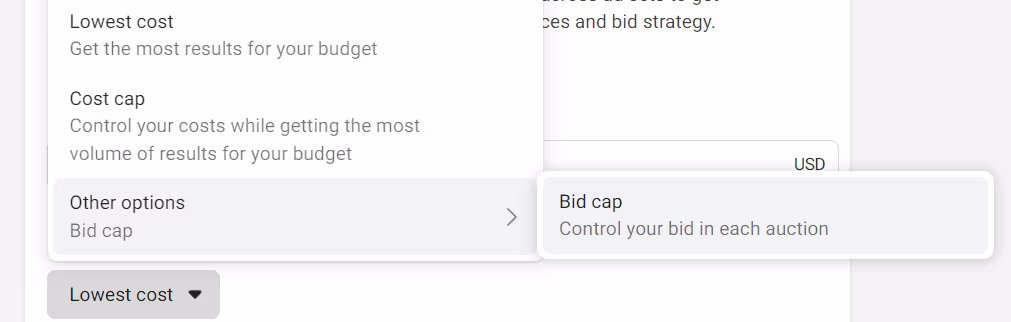
Moving on, you can also adjust the Campaign bid strategy and choose between lowest cost, cost cap, and bid cap.
After you've filled all the necessary fields, click "Next" and move on to step number three.
Step #3: Set your Facebook ad campaign schedule
If you've previously opted to run your ads on a schedule, you now have the opportunity to fine-tune it to your liking.
First, adjust the start and end dates.
Then, specify the days of the week and the exact hours in which you want your ads to run.
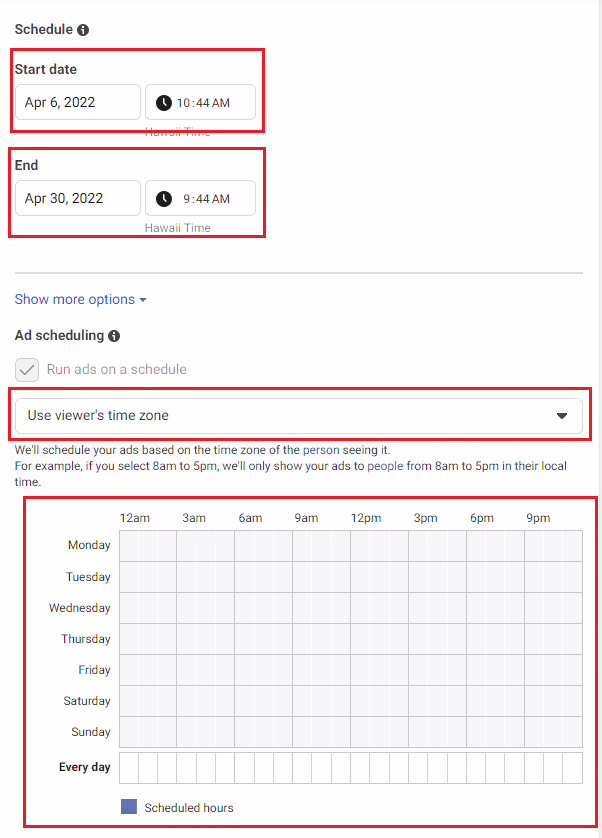
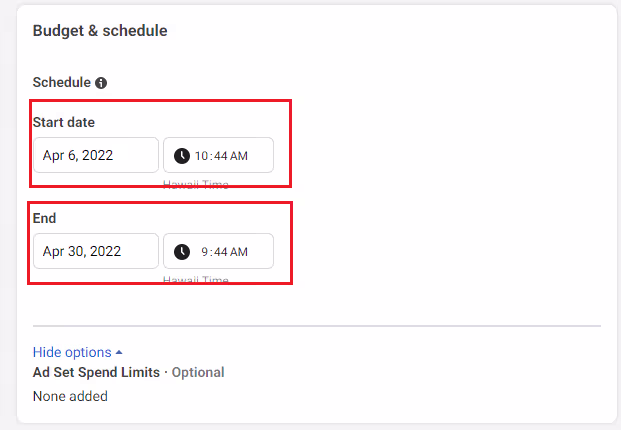
If you didn’t enable ad scheduling, you will be promoted to a more simplified "Budget & schedule" screen, where you will only have to set up the campaign's start and end date.
Step #4: Build your campaign target audience
Now comes the fun part.
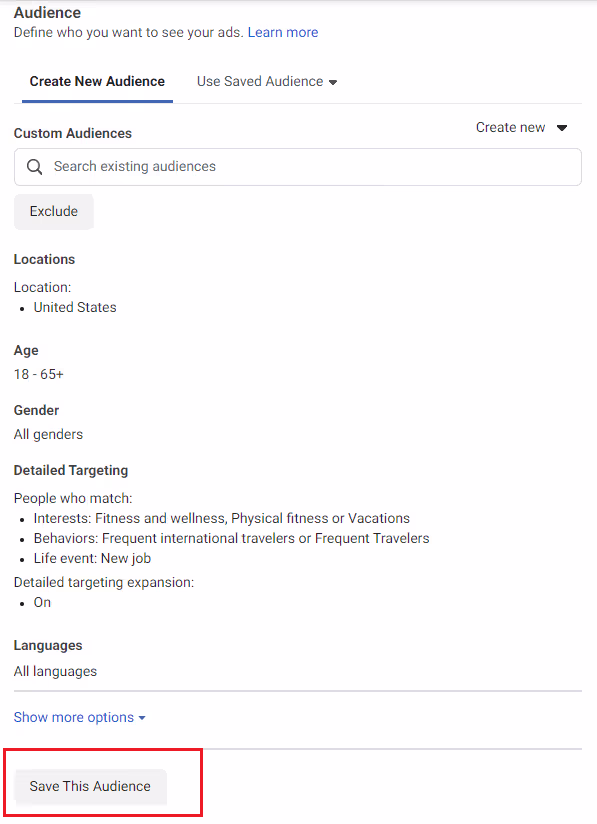
By scrolling down just a bit, you'll get to the "Audience" menu where you can define detailed targeting preferences.
First, input your preferred locations, age range, and gender.

Then, go to "Detailed Targeting" and select the most relevant demographics, interests, and behaviors.
For example, you can target people that just want a new job, who have an interest in fitness and wellness, that frequently travel internationally.
Moreover, you also have the ability to narrow your audience even further.
To do so, click on “Show more options”.
Then click on "Narrow" and add more demographics, interests, or behaviors that your new customers might have.
Additionally, you can also exclude people based on any criteria.
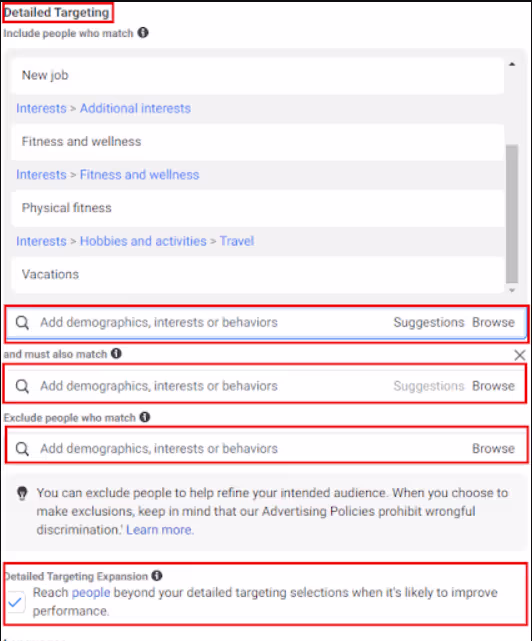
Finally, you can also enable “Detailed Targeting Expansion”.
This will enable Facebook to promote your ad to people that would not normally fit your selected targeting criteria but would contribute positively to your ad’s performance.
After setting up your audience preferences, you can save the newly created audience so you can use it in future ads.
Step #5: Pick your ad placements
In the “Placement” section, you can choose whether:
1. You want to manually pick the places where you want your ads to be displayed.
Or
2. You let Facebook handle your ad placements.

Manual ad placement gives you the ability to choose the platforms on which you want your ad to run (Facebook, Instagram, Audience Network, and Facebook Messenger). Furthermore, you can select whether you want the ads to run only on desktop, mobile, or both.
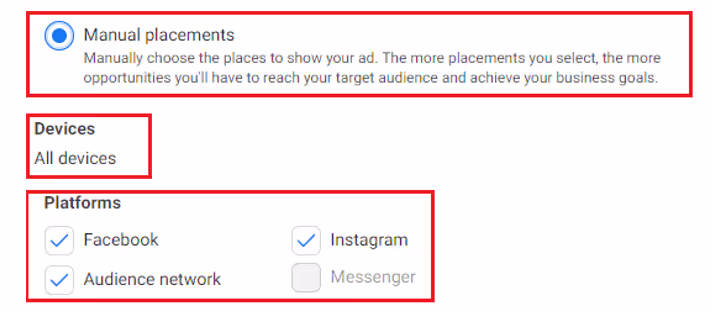
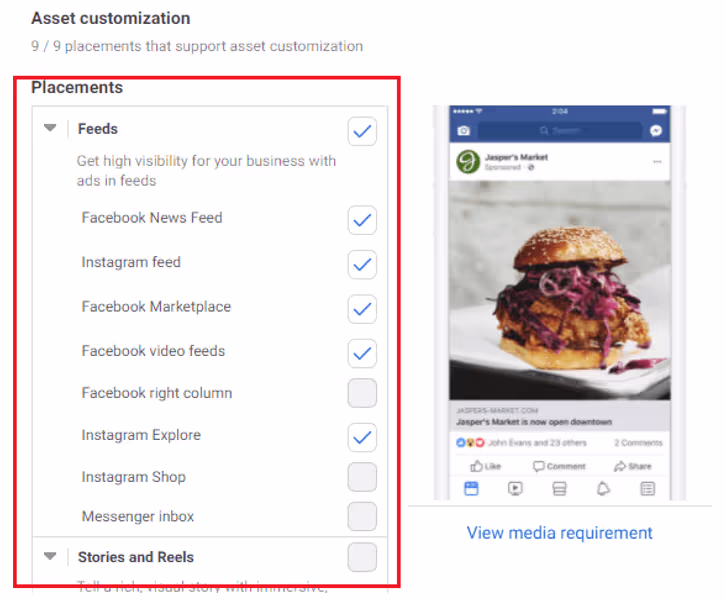
In the “Placement” section, you will see a granular breakdown of the places you could place your ads and select the most relevant ones.
For instance, you can opt to display your ad in Facebook feeds, Facebook stories and Instagram reels, streams, articles, and more.
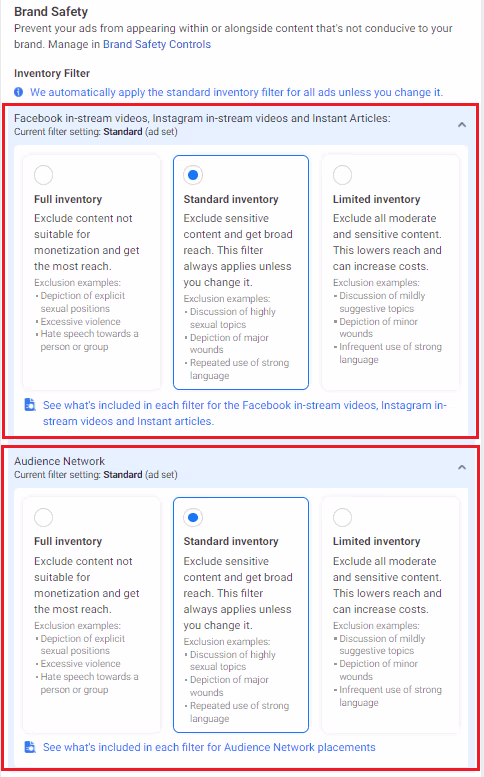
Step #6: Make sure you set up the Brand Safety section
If you're going for automatic ad placement, you should consider setting up a brand safety section to ensure your ads will not be displayed alongside posts that might hinder your brand image.
Here, Facebook provides three inventory filters you can apply for in-stream video, video, and instant article placements to ensure brand safety:
- Full inventory: Ensures the most reach since it only excludes posts that cannot be monetized.
- Standard inventory: This is selected by default and provides a decent security level while also giving your ads the ability to reach a broad audience.
- Limited inventory: Although it can increase costs and reduce the possible places where you can display your ad, it ensures they aren’t posted around moderate and sensitive content.
You can apply the same inventory filters for Audience Network.
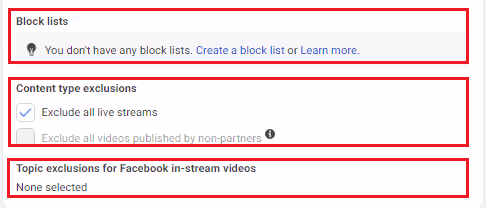
During this stage, you can also create a block list of Facebook pages, Instagram accounts, apps, etc. that you don't want to display your ads to.
Furthermore, you are able to exclude live streams altogether. If you decide to include live streams in your ad placement, you can manually exclude certain in-stream video topics.
After adjusting the relevant settings for your needs, click “Next” and go to the next step.
Step #7: Pick your ad format and create your ad
You’re almost done.
Now you get to unleash your creativity and select your creative, a CTA button, and more fun stuff.
Let’s see what you can do here.

In the first section, you can:
- Name or rename your ad
- Choose what page to run your ad
- Link your Instagram page or account
- Choose to promote an existing post, upload a creative, or use a Creative Hub mockup
- Preview your ad
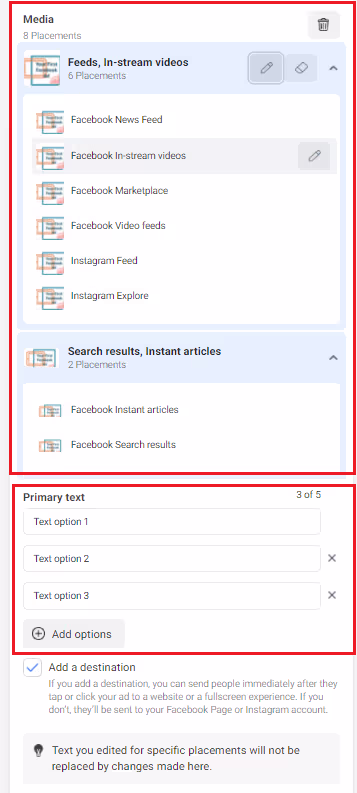
Next, you get to set up your ad creative by adding media, text, an ad destination, and a call-to-action button.
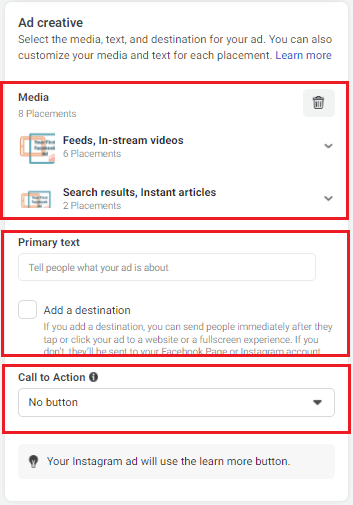
Additionally, in the "Media" section, you can edit how your ad will look in each placement and add several text options.
As soon as you finish editing your ad creatives, scroll down to the “Tracking” section. Here, you can set up:
- Website events: Add pixel code to your website to gather data on ad conversions.
- App events: Actions users take while using your app.
- Offline events: Offline sales data that help you match Facebook users that interacted with your ads with purchases, conversions, etc.
- URL parameters: Unique trackable links for each ad to ensure you can individually track conversions and identify which ad drives the most traffic, conversions, etc.
Step #8: Publish your ad on Facebook
The hard work is now done.
All that’s left to do is add your payment method and credit card details.
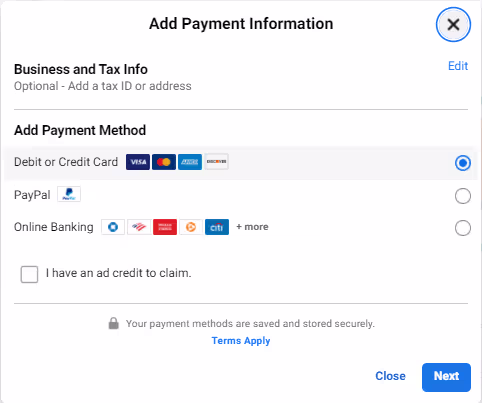
Then, simply click “Publish” and your ad will start to be displayed to your audience.
Now that we got the technicalities out of the way, there are a few things you should take into account before creating your first ad.
4 Tips to Create Great Content for Facebook Ads
To set you up for success, we’ve gathered a list of best practices to ensure you’re succeeding at Facebook advertising.
First things first… you need some top-tier inspiration, so check out Facebook Ad Library to see what other brands are doing.
Tip #1: Determine the goal of your campaign
What do you aim to achieve with your ad?
Your campaign goal should be aligned with your immediate business objectives.
What does your brand need right now?
Is it to drive traffic to a landing page? A boost in event responses? Video views? Exposure?
You should choose a relevant campaign goal to your business needs.
For instance, if you want more sales, you should choose conversions as your goal.
The point is to establish what you want to get from investing in a Facebook ad.
Tip #2: Choose the right ad format based on your needs and campaign goals
Each ad format was designed to promote different types of products and services as well as to serve certain campaign goals.
For instance, a video ad might be better for promoting a new product that you just launched.
But if you launched multiple products, a collection ad would work better to showcase each product individually.
Furthermore, you need to align the ad format with your campaign goal. Let’s say that your goal is brand awareness.
In this case, an instant experience ad is more likely to make your brand unforgettable and immerse your audience into your brand culture.
Tip #3: Determine the target audience of your campaign
When setting up your targeting preferences, please keep in mind that it’s generally best to target broader audiences than small niches.
Take a look at the table below to better understand the difference between detailed targeting and broad targeting in terms of cost per action and reach.
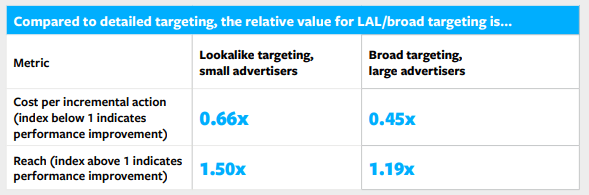
Manually adjusting your target audience settings is not nearly as efficient as Facebook’s Machine Learning targeting algorithm.
According to research, detailed targeting can cost your small business 50% more than using look-a-like audiences.
Machine learning helps you automatically process large amounts of data and maximize conversions and ROI.
So, don’t be afraid to use Facebook ad automation tools.
Speaking of leaving things to the professionals…
Tip #4: Partner up with content creators
Investing time, resources, and effort to learn how to use design, video editing, and photo editing tools is not the most productive way to go.
Instead, you can collaborate with successful content creators and allow them to do the creative heavy lifting for you.
It just makes more sense to trust a content creator that lives on social media to handle your ad creatives, right?
That’s why we’ve created a platform where creativity meets business in a few clicks.
Insense helps you find the right combination of marketing-oriented skills, creativity, and reach for killer social media campaigns.
Namely, our platform enables you to find the right creator for your brand by:
- Posting a brief and waiting for creators to send you collaboration requests.
- Browsing the Creators Marketplace and choosing the best for your project. This method enables you to find TikTok influencers and Instagram content creators.

Today we’re going to look at the first method as it is more suitable for finding capable creators with Facebook ads expertise.
To prepare a detailed brief for your future collaborators, click on the “Fill out a brief” button.
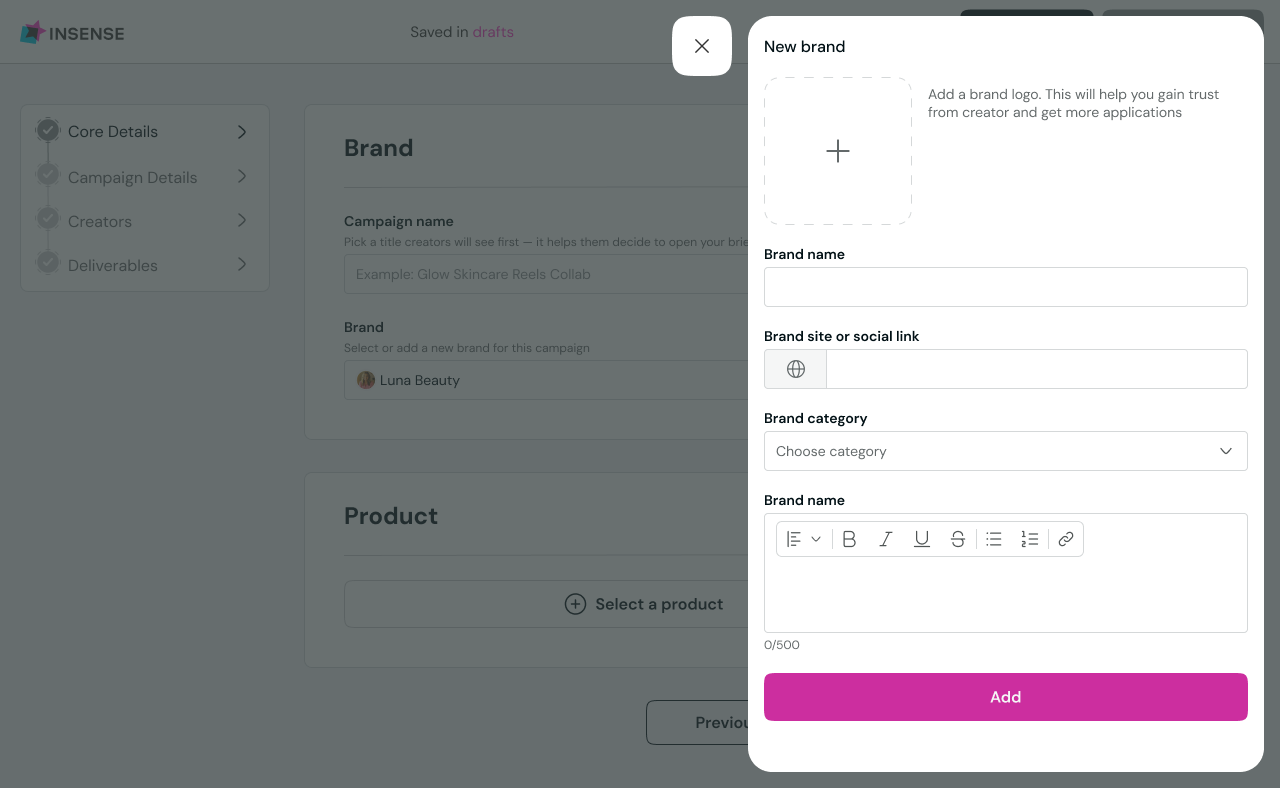
Next, go to “Brand info” and click on “Add brand”.
As soon as you do that, you will be prompted to fill in your brand information. Specifically, you need to:
- Upload your logo
- Input your brand name
- Paste your website URL
- Type in a few words about what you do
- Click on the “Add brand” button
Next, move on to the “Campaign info” field and create a campaign name that will spark interest in your project.
Right beside the “Campaign name” field, you can choose whether you want your campaign to be public or private.
Then, move on to uploading a fun campaign cover.
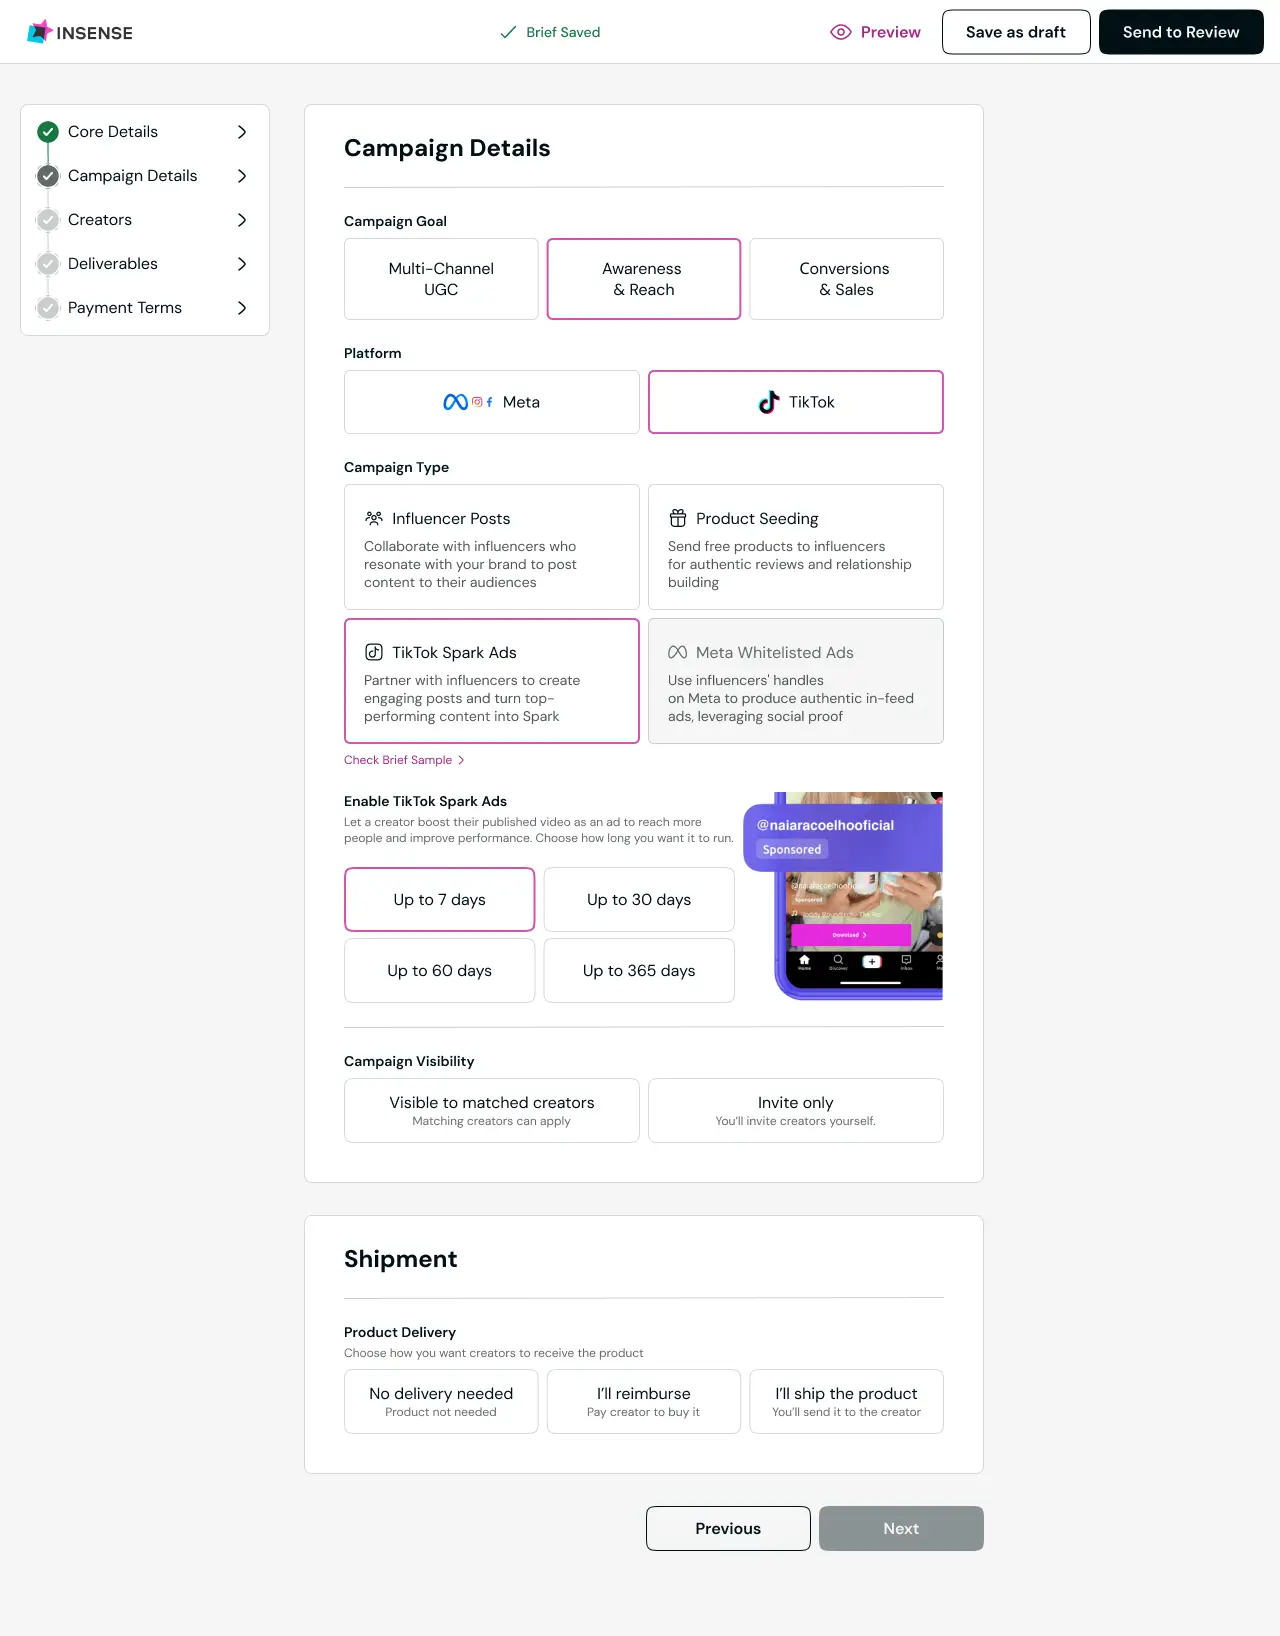
After that, feel free to choose the campaign type, platform, and campaign objective.
When it comes to the campaign type, you have two options to choose from:
- Custom Content Creation: Request professionally-made creatives for your Facebook ads.
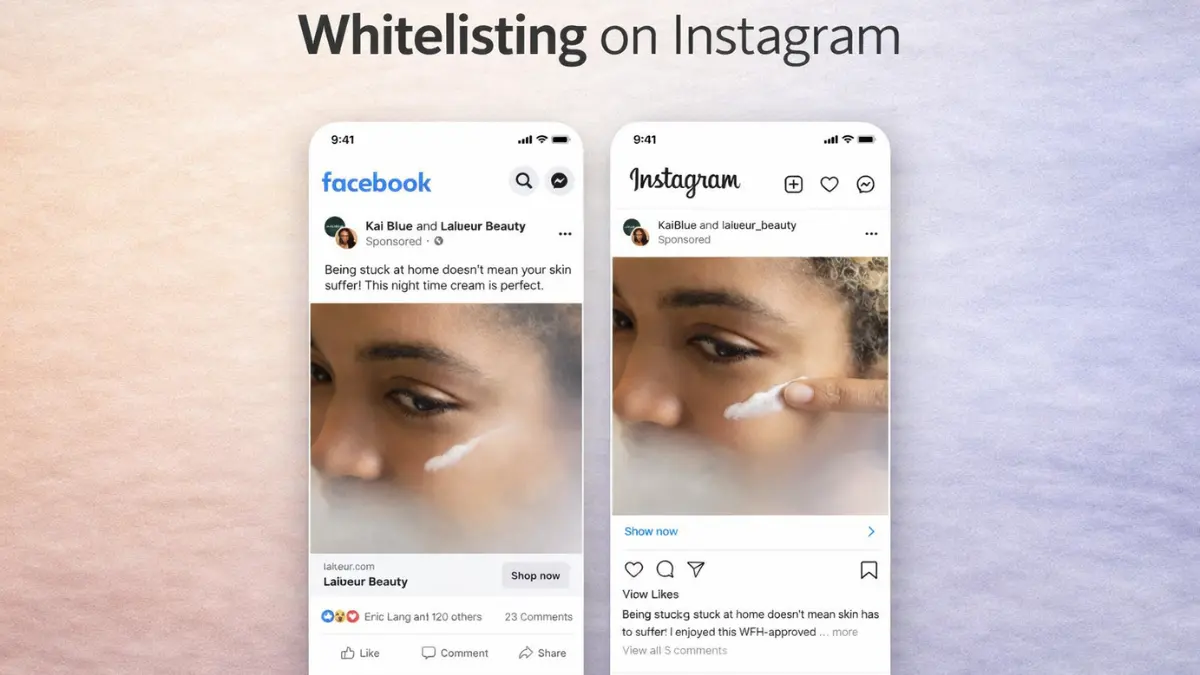
- Influencer Partnerships: Collaborate with creators for ad posting on your brand’s behalf, or on your creator’s handle using our whitelisting feature.
Next, go on and select whether you want to offer money or free products in exchange for the created content for your campaign.
Don’t forget to set up the necessary number of creators needed and the price cap per creator before moving on to the next step.

Right after that, set your campaign timing. Upon choosing the limited campaign timing, you need to set up a start date and end date.
Optionally, you can select the preferred type of product delivery you want to provide to the creators.
Next, you just have to provide a description for your product and you can move on to the next section.
Scrolling down just a bit, you’ll get to the “Desired Creators Profile” field. Here, you can fine-tune the criteria on which your creators will be selected.

Before posting your project, you only have to provide a couple of details about the creative assets you need for your ad.
Specifically, in this section, you can:
- Specify the number of creatives you need, the preferred format, and the placement
- Provide instruction on how the creators should approach your project
- Detail technical requirements
- Tell the creators what you would like them to avoid doing

And you’re pretty much done!
Now you can send your brief for review and wait to receive applications from creators matching your requests.
{{700-facebook-attributed-sales="/post-cta-component/700-facebook-attributed-sales"}}
Bonus: How to Test and Optimize Your Ad Performance
Before you go, we have five more tips on testing and optimizing your ad performance so you can get the most out of your boosted posts.
- Install a Facebook pixel so that Facebook can track the actions your audience performs once they visit your website.
This will help you create a reliable custom audience of people that interacted with your brand and create a data-driven retargeting strategy.
- Promote existing posts to serve as social proof for your potential customers.
A good post engagement rate shows your audience that your product was bought and successfully used by your customers.
This helps you bridge the trust gap between potential customers and your product.
- Monitor the days and hours during which your ads perform better and adjust your ads' schedule accordingly.
- Create multiple ads with different creatives in the same ad set and track their performance over a couple of days. Scale the ad that performs best.
- Allow Facebook to auto-optimize your ads by using the Automated Ads feature.
Let’s wrap this up!
.avif)
Now Over to You
Ready to get started with Facebook ads?
We’re here to give you a helping hand in finding the content creators your brand needs to:
- Drive engagement
- Boost lead generation
- Get more page likes
And more!
Book a demo with Insense and get started on your social media marketing campaign with stellar content.
Frequently Asked Questions (FAQs)
Q1. What are the best types of Facebook ads?
The best types of Facebook Ads are:
- Video ads: to drive engagement
- Carousel ads: to increase conversions and sales
- Collection ads: for boosting catalog sales
- Instant experience ads: for offering an immersive experience
Q2. How can I see my Facebook ads?
To see your ads go to your Facebook Ads Manager, select the ads you want to see the history of, click on the “Edit” button, and select “History”.
Q3. What does a Facebook ad cost?
On average, Facebook advertisers pay anything between $0.25 and $3.30 per click.
The ad cost varies greatly from one industry to another.
Other factors that may have an influence on your Facebook advertising cost include your ad objectives, audience targeting options, ad text, etc.
Q4. What’s the most effective type of Facebook ads?
According to marketing professionals, the most engaging Facebook ads are single image ads (24%), followed by video ads (20%).
On the other side of the spectrum, there are promoted posts (5%) and GIF, app installs, and slideshow ads (1%)